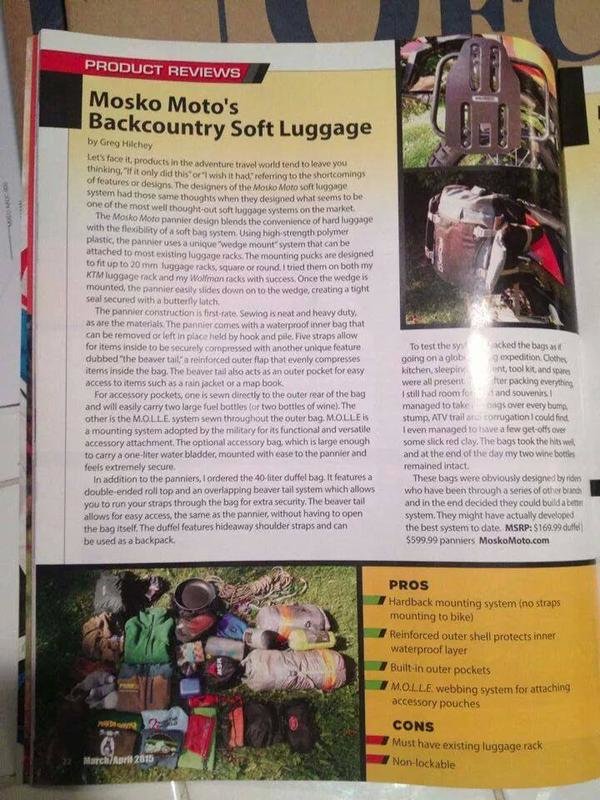
Mosko Moto motorcycle luggage

KTMphil

Senior member
Joined
Jan 11, 2011
Location
Chiang Mai, Thailand
Bikes
2007 KTM 990 Adventure Suzuki DRZ 400
A new brand that's getting some great reviews. If you're about to buy a quality touring luggage system, this might be the one for you


Story_-_Mosko-Moto-Motorcycle-Soft-Bags-Dualsport-Offroad-Luggage-Soft_Luggage-Pannier-Duffle-Saddlebag-_KTM_-_BMW_-_Rackless_-_Reckless_-_Website_grande.jpg


Website:

All Products | Mosko Moto


25 L pannier kit USD$ 450


Scout_25_pannier_large.jpg


BC_Pannier_mounting_plate_3601e4d2-4f40-4444-8493-a370fa1cea8c_large.jpg


"n" shaped all-in-one adventure bag, no racks needed USD $ 320, looks great quality


Reckless40L_Beauty_for_site_large.jpg
 
I see they do two sizes of GL type loop bag's 40 & 80 Lt, wonder how they compare quality wise to the GL and Nomad bag style's they look like they would last, i see they have rool top's and claim 100 % waterproof..


Last edited:
Some questions I posted on another forum regarding some questions I had on the Reckless system posted below. Bottom line the GL and Altirider bags seem to hold a larger volume on the sidepods than the Reckless 40 L. Also the Reckless 40l bag tops looked like they interfered with the top of the seat, clouding the seat just as my Kriega bags did.

At least the Reckless have proper PVC dry bags and not coatings for waterproofing like the sub standard Kriega bags that failed miserably.

---------------------------------
I posted the below on the ADV Mosko forum thread .


Originally i was wanting the Reckless 40 as I pack pretty minimalist. One of my primary objectives is to keep stuff off the top of the seat for bike handling and ease of mounting (I'm 5'6') the bike. Watching the video of the Reckless 40 I noticed the side bags were a lot smaller than my old kriega Overlander 30 set-up.

IMG_1346-L.jpg


I was hoping to pack everything just in the sidepods of the Reckless 40 however the above Overlander 30's are 15L per side and could not fit my hammock/tarp/quilts and I had to resort to a bivy sack and quilt w/no air pad. Also no cooking gear was packed just dried meat/fruits to further minimize packed space. I found 30 liters were the bare minimum for me with camping gear/food/clothes/spares/tools etc.

In your Reckless 40 video I was not sure where your lashing point on the bottom of the bag was positioned. It looked like it was the spot closest to the lower right corner on the right side bag( allowing the bag to sit at it's most vertical position) is this correct?

In the video the Reckless 40 looked like it was positioned quite far from vertical when on your 450. Is it possible to get the bags mounted more vertical to free up butt/leg space?

I'm currently utilizing Altriders Hemisphere bag and while not perfect it seems to carry the bags a bit more horizontal and Ideally would like the 40's to be in a similar position. Is this possible?

P1100049-L.jpg


I'm thinking if it could be positioned more horizontal I could attach the Molle bags to the fronts of the bags adding needed volume for my needs. In the video it looked quite cramped behind the hamstrings to fit the Molle pouches on the bag if you're my size.

In the Reckless 80 vid the bags were mounted a lot more vertically. The bags would be larger than I would like but I liked the bag position and the fact I could carry my complete load in the 80's side bags and hopefully just tighten down the bags with the compression straps. Would this work securely for aggressive/technical off road riding?

Sideoff any chance of getting an opinon/pics of the 80L Reckless on your 450? Would the wider bags fit securely on the 450 or does the added width of the bags over the seat make it impossible? Could you compress Reckless 80 bags down enough/securely if you're carrying only say 20 liters in the side bags? The capacity of the side bags on the 40 Reckless was stated as 15L, whats the stated capacity on the sidebags of the Reckless 80?
 
My Reckless 40 liter bag is on the way to Chiang Mai now, so will give it a review once it gets here...Import duty will be interesting.


mosko on the way.JPG
 
Mosko Moto Reckless 40 liter bag just arrived - got rogered for 3,900 Bht of import duty.


20150706_100640.jpg by Triangle Golden 007, on Flickr


Its basically a sturdy harness for 3 dry bags, with the ability to carry all your luggage low down, keeping the center of gravity low.


On initial inspection, things I dont like about it:


1. Windows on the dry bag are soft plastic. IT s just a matter of time before something solid/ sharp pokes through the window, or something chafes through on a bumpy trip


20150706_100800.jpg by Triangle Golden 007, on Flickr


2. Its designed for 2 x 15 liter dry bags on the sides & a 10 liter dry bag on the top. I think the design has been made unnecessarily "high" as the corner area space on the sides of the seat have not been used and a large top dry bag has been used in the design. If the corner areas had been used, it would be easier to get your leg over the bike, less weight high up too.


3. Over complicated. Straps everywhere. Some will argue that on a really rough trip you'll be glad you have all those straps.


20150706_101314.jpg by Triangle Golden 007, on Flickr


4. Rear fasteners need to be drilled and fixed to the bike. You might be able to wrap under the rear of the seat and avoid this.


Overall looks well made, strongest looking construction ive seen out of all these bags so far, will report more after first ride with it.


Nice velco fasteners to gather flappy ends


20150706_101923.jpg by Triangle Golden 007, on Flickr


Camping packing


While cruising around different China regions my Moskomoto http://www.moskomoto.com Backcountry Duffle (40l) arrived at the Shanghai home base.
Hate them "pizza delivery top boxes" all stickered up with reflective 3N tape looking like a garbage truck (yes - the China garbage trucks / street sweepers use 3N reflective tape not the real deal 3M tape). Prefer Kriega, Andy Strapz and Ortlieb soft panniers / duffles but like to try out new gear and the duffle looks like will fit right in....

The Moskomoto Backcountry Duffle (40l) looks very solid made and really like the beavertail feature as easy to stash & carry a decent size chain lock and nylon biker cover or other gear with easy access =
http://www.moskomoto.com/collections/all/products/backcountry-40-rear-duffle


Giving the Mosko Moto Reckless 40L its first outing on the KTM 990 Adv


P_20150922_074813.jpg by Triangle Golden 007, on Flickr


12039669_10154278423273345_3259538827278623780_n.jpg


First impressions are that the side dry bags are too thin/ tiny diameter, everthing had to be stacked up on top of the previous. This means getting to something near the bottom of the dry bag is a pain in the ass. Lots of straps going everywhere when you attach the bag cassette to the bike.


The rear attachment to hold the rear of the bag down works very well and is strong


P_20150921_214713_LL.jpg by Triangle Golden 007, on Flickr


more to come....
 
Last edited:
Been reading on this company's blog http://www.moskomoto.com/blogs/mosko-moto-blog/49058052-reckless-80-version-2-0 that the Reckless 80's are sold out now and a v.2 is going into production but won't be available until next spring.

Like Justin I was at first looking at the 40 but it looks too small. Not sure to go with the Altrider Hemisphere Saddlebag or wait to see what the R80 v.2 looks like.
 
Just did the first trip with the Mosko Moto Reckless 40 liter bag. This trip was with minimal camping gear too. With a full set of tools and 2 spare innertubes, even being bare bones, with camping gear this bag is too small on its own, you will need an additional bag for the tent/ sleeping bag.


21049100494_26aa44f61b_h.jpg


Its a very well though out set up in respect of how it fits to the motorcycle. 2 really big complaints that stand out-

1. The side dry bags are too narrow. Their diameter is so small that everything has to be squashed/ pushed on top of each other. If you make a mistake and have something at the bottom of the dry bag, everything has to come out to get to it. Also if you put things into small organized bags to go into the side dry bags, air gets trapped under so you cant push the small bag into the dry bag, its very irratating.


2. The top dry bag that fits under the beaver tail is too short. Even 2x inner tubes in it meant that there was not enough material left on the dry bag to make 2 turns to seal the dry bag top. Its a very odd shape.


The general design is excellent once you get all the fastening straps the right length. I think the Giant Loop Coyote is still the best option if you can put up with the zip, its simplicity is great.
 
They want customer feedback Phil. Hopefully the v.2 will remedy these shortcomings. The company seems to be open and have the right attitude to both their products and their customers.
 
With the Reckless 40 liter side bag diameter being a pain in the ass, Mosko are releasing a Reckless 80 liter version which will be great for touring.

http://moskomoto.com/blogs/mosko-moto-blog/49058052-reckless-80-version-2-0


mosko-moto-motorcycle-soft-bags-dualsport-offroad-adventure-soft-luggage-pannier-duffle-ktm-bmw-.jpg


mosko-moto-motorcycle-soft-bags-dualsport-offroad-adventure-soft-luggage-pannier-duffle-ktm-bmw-klr-rackless-reckless-tank-bag-adventure-jacket-pants-jersey-9-19-1512.jpg


Reckless 80 Revisions
We're now essentially sold out of the Reckless 80 (the Reckless 40 is still in stock). I have some with me here at this show, and we're keeping a few at the warehouse for our own purposes, but aside from that we're now looking toward the Spring 2016 production order, and thinking about some design revisions, taking into account all the feedback we've received over the last few months.
There are a number of revisions to stitching, hardware, and construction which I won't detail here because a) it's a lot and b) it's not all that interesting. Mostly we're just adding bartacks, webbing, and reinforced stitching in a variety of spots to add strength and long-term durability. Most of those construction revisions are fairly straight-forward, so in this post I'll focus on the design revisions instead.
Modular Harness
We're changing from a one-piece harness to a three-piece harness. There are a number of advantages to this. First, it's easier to manufacture and easier to repair, because three individual pieces can be run through a sewing machine much easier than one large piece. Second, it's less expensive to ship, both from the factory to us, and also from us to the customer. Third, it can be more easily packed for fly-to-ride trips, like the one I did in SE Asia last winter. And finally, in the event of a crash, the individual pieces can be replaced individually, without having to replace the entire bag.


  • The first and most requested change is that we'll attempt to add a fuel fill hole for rear-fueling bikes like the KTM 690. So many riders have requested this, we're going to give it a try. We've mocked up a rough prototype in our shop and we think it's going to work.
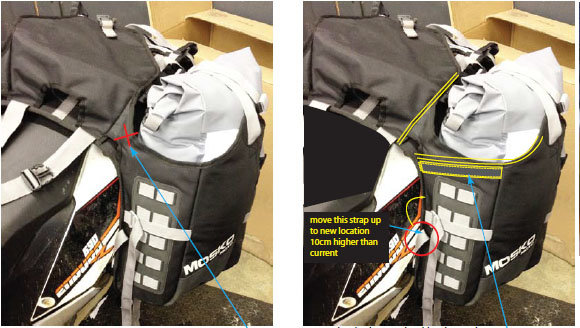
  • Next, instead of stitching the top buckles onto the bag harness, we're going to use the same aluminum bar construction we're currently using on the legs. That way all the load-bearing straps can be easily replaced/repaired in the field without a sewing machine. In the pic above you can see there will be three new aluminum bars on top, holding the attachment buckles down, and providing multiple attachment points for the rear connection straps.
  • Additionally, we're adding daisy-chain loops on the front/rear of the harness for riders who want to tie-down a different rear drybag than the one we supply with the R80. A number of riders are already swapping out different dry bags for different trips. In fact, I did that myself on my last trip, subbing a Scout 30L for the included drybag. It works, and this will make it a little easier to secure the substitute drybag if desired.
  • Finally, we're changing the design of the rear drybag (not shown above) to accommodate all of the above. The roll top will now run parallel not perpendicular to the direction of the bike.
As a reminder, here is what the aluminum bar design currently looks like on the legs. So this same construction will apply to the connecting straps on the top of the harness as well.


RECKLESS 80: VERSION 2.0

September 19, 2015
It's been a little while since our last blog post. After a busy summer, everyone was squeezing in some last minute vacation time, so a few weeks elapsed without a post.
I was back from vacation for one week and then immediately took off on a two week, 3,000+ mile road trip for the KTM rally in Crested Butte, CO (where I am now) and the Horizons Unlimited Travelers Gathering in Mariposa, CA. I'm writing from my camper in Crested Butte, connecting to the internet via my phone, looking out the window at our booth, and keeping an eye out for customers. Pretty much all the riders are out riding now, so I'm taking advantage of this little break in the action to post a quick - and long overdue - update.
The focus for today's blog: Reckless 80 design revisions.
Reckless 80 Revisions
We're now essentially sold out of the Reckless 80 (the Reckless 40 is still in stock). I have some with me here at this show, and we're keeping a few at the warehouse for our own purposes, but aside from that we're now looking toward the Spring 2016 production order, and thinking about some design revisions, taking into account all the feedback we've received over the last few months.
There are a number of revisions to stitching, hardware, and construction which I won't detail here because a) it's a lot and b) it's not all that interesting. Mostly we're just adding bartacks, webbing, and reinforced stitching in a variety of spots to add strength and long-term durability. Most of those construction revisions are fairly straight-forward, so in this post I'll focus on the design revisions instead.
Modular Harness
We're changing from a one-piece harness to a three-piece harness. There are a number of advantages to this. First, it's easier to manufacture and easier to repair, because three individual pieces can be run through a sewing machine much easier than one large piece. Second, it's less expensive to ship, both from the factory to us, and also from us to the customer. Third, it can be more easily packed for fly-to-ride trips, like the one I did in SE Asia last winter. And finally, in the event of a crash, the individual pieces can be replaced individually, without having to replace the entire bag.

The three pieces will be connected by chicago bolts. Here are a few pics of the rough mock-up we made in the shop by cutting up one of the current version R80s.


The underside of the harness will have a hypalon flap that covers the metal chicago bolts and protects the bike from abrasion scratches.

Harness Centerpiece
Next, there are some major changes coming to the centerpiece on the bag harness.


  • The first and most requested change is that we'll attempt to add a fuel fill hole for rear-fueling bikes like the KTM 690. So many riders have requested this, we're going to give it a try. We've mocked up a rough prototype in our shop and we think it's going to work.
  • Next, instead of stitching the top buckles onto the bag harness, we're going to use the same aluminum bar construction we're currently using on the legs. That way all the load-bearing straps can be easily replaced/repaired in the field without a sewing machine. In the pic above you can see there will be three new aluminum bars on top, holding the attachment buckles down, and providing multiple attachment points for the rear connection straps.
  • Additionally, we're adding daisy-chain loops on the front/rear of the harness for riders who want to tie-down a different rear drybag than the one we supply with the R80. A number of riders are already swapping out different dry bags for different trips. In fact, I did that myself on my last trip, subbing a Scout 30L for the included drybag. It works, and this will make it a little easier to secure the substitute drybag if desired.
  • Finally, we're changing the design of the rear drybag (not shown above) to accommodate all of the above. The roll top will now run parallel not perpendicular to the direction of the bike.
As a reminder, here is what the aluminum bar design currently looks like on the legs. So this same construction will apply to the connecting straps on the top of the harness as well.

Leg Connection Points
Next, we're moving the leg attachment point (shown in the pic above) from the outside of the harness to the inside of the harness, behind the drybag.

This will prevent wear on the webbing pockets that hold the aluminum bars in place. An example of that wear is shown below from my own personal bag. This only seems to happen on certain bikes/configurations, and if you experience it, it can be easily repaired with a hypalon patch attached with chicago bolts.

Beavertail Attachments
With the new three-piece design, we're also eliminating the "corners" where the beavertail attaches to the side bags. These fabric connection don't perform a function, and we never intended them to be load-bearing. We've found that on thinner profile bikes, especially where riders are carrying lots of additional items under the beavertail besides the included drybag, these corners are actually holding a ton of weight. So in the new design we'll eliminate them entirely and reinforce the entire top edge of the side harness with 1″ webbing.

Dromedary Nozzle Opening
Earlier this summer I noticed that the Reckless 80L rear pocket fits an MSR 2L dromedary bag perfectly. Then I went for a 35 mph pavement slide with the dromedary in there, and the plastic nozzle wore a hole through the pocket right where the nozzle normally sits, which actually turned out to be really convenient, because now I can get to my water nozzle without removing the drom bag. So we're going to add a dromedary opening on the rear pocket just like the one on our large MOLLE ba, making the Reckless 80 rear pocket a convenient spot for water storage in addition to fuel bottles, tools/tubes, etc.


External Armor Panels
Now that we've observed (and personally experienced) a large number of crashes on the Reckless 80, both on pavement and dirt, we're changing the position of the R80's external hypalon armor panels to accommodate the wear patterns we observed, as show below. We found that in a slide, the bag actually moves and pushes, and some of the wear occurs on the bottom of the bag instead of on the outside edge.


They talk about it in more detail in this video if you skip on to 18 minutes.


First time with the Mosko Moto Reckless 40 (liter) on the Ducati Hypermotard, for a trip into Myanmar. No racks, the bag fits perfectly over the very high pillion seat. The side panniers follow the contours of the bike well and stay well forward of the rear wheel.


mosko by Triangle Golden 007, on Flickr


13659169_10155138156238345_3863097960574126873_n.jpg
 
Reckless 40 V2 has been out for a few weeks now. It looks like the main difference is the center/ top rolltop bag is now a bigger round bag. On the V1 the bag was a horrible squarish shape and hard to roll top the closure. The new center bag looks good, but swinging your leg over the bike will be a pain, so you lose all the advantages of using a pannier set up.


https://moskomoto.com/products/reckless-40l-system


mosko_moto-reckless_-motorcycle-soft-bags-dualsport-offroad-adventure-soft-luggage-pannier-duffle-ktm-bmw-klr-adventure_4_bd155175-def9-4762-a0f8-cc5c6447608f_large.jpg


New round center bag


mosko_moto-reckless_-motorcycle-soft-bags-dualsport-offroad-adventure-soft-luggage-pannier-duffle-ktm-bmw-klr-adventure_9_50c0b715-a58d-4ad5-b483-a3071b704806_large.jpg


[FONT=&quot]The Reckless 40L (V2.0) is a rackless pannier/duffle system that easily mounts on any motorcycle, with or without pannier racks. We designed this bag for day trips on larger bikes, baja-style hotel-hopping, or overnight camping from a smaller bike. The Reckless 40 is 100% waterproof, with three separate removable welded-seam drybags that slide/strap into an outer harness, which stays attached to the bike. If you're setting up a new bike, the Reckless system saves you the added weight and expense of metal pannier racks, while still providing a traditional 3-bag organizational system (i.e. two side panniers and a rear duffle).
All three drybags have roll-top closures, and they can be easily and individually accessed throughout the day, so you don't have to mess with the holster attachment straps to get to food, clothes, or tools. The side drybags have clear panels on the front, so you can tell which bag has what you need, and they have stiffeners in the back to reduce movement while riding and make it easier to slide into the holster. They also have webbing handles at the bottom, so they can be more easily pulled into the holster.
The center bag on the Reckless 40 is our Stinger 8 Tailbag. It turns into a backpack with mesh backpack straps that unfold from inside the bag, in case you want to go for a day hike on your ride, or run into town for errands. The Stinger 8 also has 4 sewn-on connection straps with matching ladderlocks, so it can be rigged as a standalone fender bag, tail bag, or pannier topper without the Reckless 40 harness.
The Reckless 40 has separate rear pockets on both sides, which are perfect for storing fuel bottles, water bottles, tools, and tubes. The two overlapping rear beavertails are a great spot to tuck a motorcycle jacket when it's not in use, or to store wet things - like a rainfly, towel, or campsite garbage - that you don't want inside your drybag.
The rear beavertail has a padded goggle pocket which also fits a Spot, InReach, or cell phone. On the inside surface of the front beavertail there's a mesh pocket for storing wet/dry items (like toothbrush/paste) or bike documents inside a waterproof baggie.
If you would like to expand the capacity of your Reckless 40, we recommend adding a Stinger 22 Tailbag. This is the same tailbag we include with the Reckless 80. Like the Stinger 8, the Stinger 22 also converts into a backpack, and can be rigged as a standalone tailbag. The Stinger 22 adds 14 additional liters of volume. The larger dimensions are great for packing bulkier items, like a sleeping bag, which would not typically fit in a Stinger 8. The Stinger 22 also integrates seamlessly with the Reckless 40's beavertail closure.
With the Stinger 8, the Stinger 22, and the Reckless 40, you will have 4 different storage options for your bike: 1) a standalone 8 liter tailbag, 2) a standalone 22 liter tailbag, 3) a 40 liter harness luggage system, and 4) a 54 liter harness luggage system. So you can fine-tune your carrying capacity for each trip.
The Reckless 40L comes with one laser-cut aluminum exhaust heat shield.
Please Note:
a) Every Reckless 80 and Reckless 40 comes with an included heat shield. Please use the heat shield! Exhaust and exhaust heat burns are not covered by your warranty. Before you leave for your trip, we recommend checking and double checking that no part of the bag or your bike's plastics are contacting the exhaust. On dual-exhaust bikes or bikes with especially high/exposed pipes, you will need a second heat shield, which is available for purchase in the 'Hardware & Parts" section of our website. When installing the Reckless system on your bike, please make sure the exhaust is not blowing directly on the bag. In general, make sure the bag is not touching or close to extreme heat; go physically around the bag daily, cinch it tight, and make any necessary adjustments.
b) The Reckless 80 and Reckless 40 were designed for rugged riding. They have a durable hypalon and ballistic nylon backing that can rub against the plastic parts of the bike, resulting in minor abrasion. Please take precautions if you do not want your bike parts marred by placing a clear adhesive sheet to where abrasion may occur on your motorcycle. Some examples of protective products are listed below. We suggest taking a short test ride with protection applied and with a loaded Reckless installed on the bike to assure satisfactory results.
Allstar Performance Tape
3M Polymask Protective Tape
c) There are many "wear points" on the Reckless system that are different on every bike. See this video for examples. These could be on the bottom of the bag - where the harness touches the bike or luggage rack - or on the drybags themselves, where they contact the harness, tent poles, or other items. After your first day or two of riding, please inspect the bags carefully, identify high-friction wear points, and either remedy the friction or apply a sacrificial 'patch' that can be periodically replaced before the bag itself is damaged. In particular, it is normal for the fabric on the bottom of the harness to show wear, and this does not affect the structural integrity of the bag nor its waterproofing.

  • If friction causes the fabric on the bottom of your bag to wear through, this is not a big deal. There is a hard plastic plate inside the Reckless harness that will prevent the friction from reaching your drybags, and thereby affecting the functionality of the system. Fabric, vibrating under pressure between the hard plastic inside the harness and a hard metal bike part, will eventually wear out. To prevent this, apply a sacrificial patch to the wear point, or apply some padding on the bike.
  • If your connection straps are wrapping around a sharp metal edge, for example on a bag mounting cleat, foot peg, or luggage rack, and the straps begin to show signs of wear, it is critical to address the wear before the strap is too far worn to use. Either file/grind the sharp edge, or apply (and maintain) a sacrificial 'sleeve' for the webbing made from fabric, additional webbing, or duct tape. A sharp metal edge vibrating under pressure will eventually wear through webbing, sometimes quickly. If this occurs, take some extra webbing to a local sewing shop and they should be able to easily repair the damage.

[h=4]FEATURES[/h][h=4]VIDEOS[/h]
Please note: this video is for our Reckless 40 v1.0. We are currently shipping the Reckless 40 v2.0, which offers some added features. We will get a new video up soon!
[h=4]DIMENSIONS[/h]


[/FONT]

[FONT=&quot][h=4]VIEW MORE:[/h]
[/FONT]
 
Back
Top Bottom